Monday 24 August 2015

{Recipe} ~ Rainbow Cake with Cream Cheese Icing


Ingredients:
Note: the below ingredients make 2 layers of sponge, multiply accordingly as per the amount of layers you want, for example if you want a six layer cake, make this mix 3 times.
For the sponge mix:
225g plain flour
125g butter, (soft - allow to come to room temperature)
3 medium eggs
150g golden caster sugar
1 tsp baking powder
1 tsp vanilla extract
edible food coloring - red, orange, yellow, green, blue & purple
( I use Wilton gel food coloring, can be purchased online, any good baking shop or in Homestore and more! The gel colors are best as they have a more intense color and doesn't water down the mix! It's best to buy the multipack as you will have a better selection of colors and although the pots are small a little goes a long way!!)
For the cream cheese icing:
1tsp vanilla extract
750g (3 x 250g tubs) cream cheese (full fat works best!)
350g icing sugar


You will need:
2x 12" baking tins( If you have a different size tin, slightly smaller or bigger that's ok your layers will just be thicker or thinner, the secret is to measure out each batch exactly so that theres the same amount of cake mix in each layer to create even layers!!)
1x large bowl
Handheld or stand mixer
Grease proof paper
Butter for greasing tins
Spatula
Sieve
Weighting scales (I prefer digital for precision)
6x smaller same size bowls
Cocktail sticks


Method:
1.                Heat oven to 180C/160C fan/gas 4. Grease 2 baking tins and line the bases with grease proof paper/baking parchment. Put all the sponge ingredients into the large bowl, apart from the food coloring, sieve the flour and baking powder so there's no lumps, then beat with an electric whisk until smooth.
2.                When all the ingredients have been combined, divide the mixture into 6 bowls and measure so that they all weigh the same, use all the mix scraping down the bowl with the rubber spatula (I find using the same style and size of bowl best as the bowls will all weigh the same initially so when the mixture is added it's more accurate) Once you have the mixtures weighed, now comes the fun part, adding the colors! Use a cocktail stick to put some of the gel in each bowl, use a different stick for each color so as not to mix colors. Mix the colors in well in each bowl with a spoon add more color with the stick if you need to, the color of the mix now will be pretty close to the baked cake color!  Scrape the different batters into the tins, trying to spread and smooth as much as possible but try not to waste a drop of the batter a rubber spatula will help you. Bake in oven for 12 mins until a skewer poked into the middle comes out clean.
3.                Gently turn the cakes out onto a wire rack to cool. Wash the tins and add the next 2 colors and bake again, repeat this process until all 6 layers are baked. Leave them all to cool.
4.                To make the icing, this can be done while waiting on the cakes to bake in the oven. Beat the vanilla and cream cheese with an electric whisk until smooth. Sift in the icing sugar and gently fold in with a spatula. Be careful – the more you work it, the runnier it will get, increasing the chance of splitting. I find it works best if you put the prepared icing in the fridge for a half hour to let the mixture firm up slightly, which makes it easier to spread onto the cakes. This will also allow all your sponges cool before you start assembling the cake.
5.                Remove the icing from the fridge and put a dollop on your cake stand or plate, This will help the cake stay in place on the plate. Place first layer of sponge on top, next spread some icing on top of this layer of sponge and evenly spread to the edges, place next layer on top and repeat until all layers are complete. Next cover the complete cake in a thin layer of icing (crumb coat) and place in the fridge for half an hour. Remove from the fridge and use remaining icing to cover and decorate cake, this should give you a clean finish with no crumbs coming through! Leave as it with just icing or finish with sprinkles or other decoration. Keep in a cool area or in the fridge until needed as the cream cheese icing will soften quickly.
Note: I made 5 layers with this cake as I used the 6th bowl to make mini cupcakes, but you could use it as the orange layer in the cake!
Also I've multiplied the ingredients by 3 initially so I had quite a large mix to deal with but if you prefer to make in individual batches as per ingredients that will give you 2 layers and just repeat the whole process 3 times, whichever works best for you!


Saturday 22 August 2015

{Recipe} ~ Turkey Burgers with Sweet Potato Fries

This is my first time making these, I usually make them with beef mince but decided I'd try them this time with turkey mince. 


Serves 2, Makes 4 burgers

~NOTE: There are a few bowls, pots and trays used in this recipe so hence some washing up to be done so I prefer to make this on the weekend when I have more time rather than a weeknight!!! 

You will need: 
400g turkey mince 
1 Glove of garlic
1 large red onion 
6 small mushrooms
2 slices of sliced pepperoni, diced 
1tbsp of grated Parmesan 
1tsp of red pesto
2 medium sweet potato 
Handful of broccoli florets 

Method: 
Turn on oven, set at 180' 
Place turkey mince in a bowl 
Dice 2 of the mushrooms, half of the red onion and the garlic clove (I used the handheld dicer from Ikea) 
Pour this into the bowl with the turkey along with the pepperoni, cheese and pesto and mix well. 
Heat some butter in a pan on the hob
Divide the mix into 4 and roll into a burger shape, dust in some plain flour. 
Place burgers into pan and fry off on both sides to crispen the outside
While the burgers are in the pan, place the broccoli, remaining mushrooms and sliced onions on a baking tray. 
Peel and chop the sweet potato and place in a separate tray and season accordingly, I usually spray them with some oil and sprinkle some garlic pepper and aromat on them and shake to coat 
Pour some hot water on the pan to unstick any bits or flavor that has baked into the pan
Now place the burgers in your tray along with the broccoli, onions & mushrooms and pour in any liquid that's left in the pan. 
Cover the tray of burgers with tin foil, leave the sweet potato uncovered and place both in the oven for 30minutes. 
The sweet potato may need to be turned during that time! 
After 30 minutes the sweet potato should be crispy and when the burgers are uncovered should be cooked through and the veg softened and flavored having been cooked in the burgers juices. 
Serve & Enjoy x

~ Tip* I usually serve these with the Knorr Pepper & Coriander sauce but they are equally nice served on their own with some caramelised red onion on the side (recipe for homemade caramelised red onions follow!) 


10 things I can't live without!!

Not in any particular order but all equally important in their own way!!!! 

1. My phone
It's like an extension of my arm, anyone that knows me knows that my phone is never far from my side! I love catching up on social media, checking out the latest news and gossip on the Daily Mail or just browsing Pinterest for inspiration!! I recently upgraded from an iPhone4 which I'd had for about 3 years, to the iPhone 6 and I LOVE it! I am a loyal Apple Fan, I have all the gadgets, Apple TV, iPad, iPod, iPhone, (dreaming of getting an iMac!!) I can't really find fault with them, I think I'm just used to the layout and software and love having all my devices synced. The iPhone 6 is amazing, I can't believe I didn't get it sooner, it did take a bit of getting used to as it's much bigger than my previous iPhone 4 but I'm now used to the bigger screen, sleeker design and love the new features esp the fingerprint sensor!!! 


2. Skechers
I can't speak highly enough about these, they really are like walking on clouds! I bought my first pair in the outlets in the U.S. back in 2013 and immediately fell in love with them, I must own about 20 pairs now!!! 🙈 I think I bought about 8 pairs on honeymoon earlier this year alone!!! They are quite expensive but they are worth every penny, the first pair I ever bought I still have and they are perfect, even after being thrown in the washing machine countless times!! I have a pair in every colour and will try get away with wearing them as often as I can!!! 


3. Garnier Micellar 
I only discovered this about 2 months ago but am already a major fan! It feels just like water on the skin and removes makeup effortlessly. My eyes are quite sensitive even with special eye makeup remover they would sting but this is amazing, it removes my eye makeup perfectly with no redness or stinging!! A little goes along way so you really get value out of it. I find it great for just freshening up my skin during the day if my skin is feeling a little oily or sweaty without being too harsh on the skin! 

4. Maybelline - The Eraser
I don't usually wear much makeup if any during the week but I find this little product great, it's brilliant at concealing dark circles and blemishes on the skin without feeling too heavy either. I love that it also applies directly onto the skin by twisting it and the product then comes out through the sponge at the top so that it can be put directly onto the skin like a pen. I usually just use this with some blusher and bronzer on top to give my face a bit of colour!! This is also great for contouring when used in lighter and darker shades! 


5. Nivea - A Kiss of Care & Color
*Unfortunately this isn't available in Ireland.
I got this when in the U.S. earlier in the year and absolutely love it, as I said I don't wear much make up during the week but find this great to use as a lip balm while adding a pop of colour. I've since got my sis-in-law to pick me up some more when she was in America to keep me stocked up for a while!! These are my two favourite colors!! 


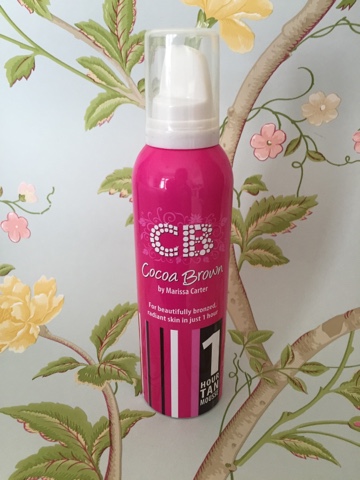
6. Cocoa Brown Tan 
My Fave Tan Ever!!!! 
I absolutely love this stuff, I've used various tans in my time but since I first tried this I've fallen in love with it and haven't used any other tan since. It suits my skin perfectly and creates a beautiful colour that can be gradually built up over time. I usually put it on at night and wash it off the next morning, I find just applying it once gives my skin a nice healthy glow without being too dark as I have quite pale skin. I find it gradually wears off too so no horrible patchy tanned skin!! 
By far my fave tan! 👍🏻

7. My Slow Cooker 
This is literally the best thing ever! I got this 5L Morphy Richards one about a year ago and can honestly say it's one of the best purchases I've made, it's so convenient and easy to use, I usually prepare all my meat and veg at the weekend for the week ahead and put it in ziploc bags, then during the week I come home at lunch and pop the meat and veg into the slow cooker with some seasoning and hey presto dinners ready when I come in the door from work! 
Apart from the convenience of it, the tenderness of the meat and flavor of the food is amazing, it can't be compared to anything cooked in a pot!! 
(Slow cooker Roast Beef is a definite must try!!!) 

8. My Kitchenaid  
Ok I love my gadgets and this is probably the most extravagant one I have!!! 
I've ALWAYS wanted a Kitchenaid (maybe from watching one too many American cookery shows and seeing them in all their beautifully colored glory!!!!!) so after stretching my Aldi hand mixer to its limit I decided to splash out and buy myself a Kitchenaid!! As I began baking more, it turned out to be a valued gadget in my kitchen, it's super convenient, having spent many a time standing over bowls whisking with my hand mixer, this with all its fancy yet practical gadgets (large metal bowl, dough hook, ballon whisk, paddle mixer & splatter guard) was a very welcome addition to my kitchen!! I love all the colours they come in and decided to get the red one as this was the colour theme in my kitchen (one day I hope to have my own quirky styled cake kitchen with a cerise pink Kitchenaid!!! 🙏🏼) 
I also splashed out on some additional items for it like the rubber edged paddle mixer, glass bowl and of course the ice cream maker bowl!! This is one of my fave gadgets in my kitchen and also looks great sitting pride of place on the countertop at all times!!! 

9. Lyons Tea 
The great debate, Lyons or Barry's??? 
I'm a Lyons Gold Blend type of girl all the way, always overstocked in my kitchen in fear that one day I may run out!!!!! Although on the rare occasion that I make a pot of tea using loose tea, then I will stray to the other side and use Barry's loose tea leaves!! But apart from that it's gotta be Lyons tea, I am a total tea addict and probably drink about 4 or 5 cups a day (quiet considerably more in the cold winter months!!!) 
I like mine strong, piping hot, drop of milk, no sugar and in my favourite mug (now that's a whole other topic!!!!) 

10. Dark Chocolate 
I have a major sweet tooth, I'm the type of girl who goes out for dinner and looks at the dessert menu first!!!! But I try to eat well 90% of the time and find dark chocolate satisfies my sweet tooth craving!! I would choose a 'Bournville' bar over a 'Dairy Milk' any day or splash out and go for a Lindt high % bar or my fave above the 'Lindt dark Mint intense' which is amazing (I also love to use some in making Chocolate Brownies for that little hint of mint!!!) 
A cup of tea and some dark chocolate while watching the soaps = Bliss 

I hope you enjoyed reading through some of my fave items and why!! 
Im off now to make a cup of tea and have some chocolate!! 

Caoimhe 
xXx

Thursday 20 August 2015

Who is she?!


Hello & Welcome to my Blog!

My name is Caoimhe Flinter (Still getting used to that!! I only got married in March this year so still readjusting to my new name!!) I'm a wife to my amazing Husband Stephen and mammy to our little 'Baby' Kiki!! (a miniature Yorkshire Terrier, that's her in the header!!) I'm 28 years old and live in the house that my self and Stephen built back in 2010, (with the help of our parents and some builders along the way!!!) which i love decorating and designing and constantly picking up new ideas and items for!! 
I went to college in DIT for a year studying Retail & Services Management, but didn't feel like it was for me so i completed my first year and they went on to get a Diploma in Interior Design, which i absolutely LOVE! During the time of getting my diploma, i was given the opportunity to open my own business, which was a Gift and Jewellery Shop in my local village, i opened it in November 2006. It was hard work and as i ran it on my own it took up a lot of my time but i loved it all the same! Unfortunately due to the 'recession' i had to close its doors in April 2010 but am very grateful for the experience and learned a lot from it!  I'm known for loving a great bargain and also a great find!! I love all things pink, unusual and anything to do with baking, I've always had a great interest in baking and creating recipes but it really blossomed when we moved into our 'new' home! I'm always trying out new recipes but unfortunately that can pack on the lbs! so i began creating cakes for friends and families for birthdays, christenings and different events, that way i got to try out recipes and fulfill my love of baking without having to consume all my creations, (Not that its a bad thing but over time it doesn't help the waistline!!) 

I've set this blog up as a place to share my ideas and inspirations on things i love. 
I'm naturally a creative person, i love to make, bake & create. I'm known for always wanting to do things a little bit different and unique to me! If i am going to do or create something i will want to put my own stamp on it! Whether that's a party I'm organizing, a cake I'm making, a room I'm decorating or the new outfit ive bought for Kiki, i just like to be a little bit quirky!! I will be blogging on all things that interest me, i love coming up with new ideas and creating new things and will enjoy sharing this with you all. If there anything you like me to blog about please leave me a comment!


I hope you enjoy, sitting down with a cuppa tea and having a browse through my blog!!!

Caoimhe 
xxx

Related Posts Plugin for WordPress, Blogger...